Kochol Game Engine  0.1.0
 All Classes Namespaces Files Functions Variables Typedefs Enumerations Enumerator Friends Macros Pages
Hello Kochol Game Engine

Introduction

This tutorial shows you how to setup visual studio for working with KGE then we will write a program that initialize the engine and adds a simple box to scene.

Setup your compiler

This section will explains how to setup your compiler for working with KGE Currently we use Microsoft Visual Studio and I will explain how to configure it , but you will also be able to understand everything about compiler setup if you are using another compiler.

For start we need some Requirements: Latest Version of KGE pre built. Download the latest SDK

Step 1: Create a new project

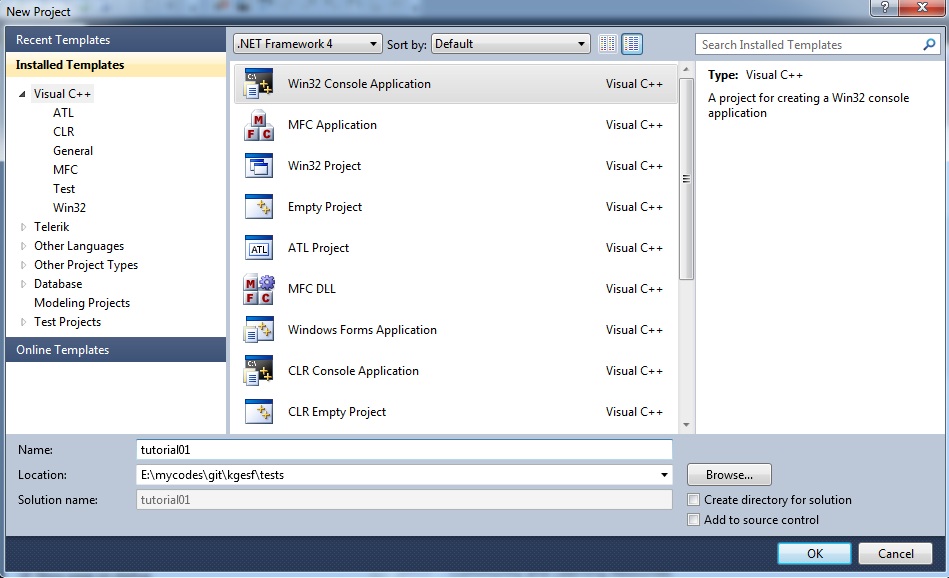
Open Microsoft Visual Studio on your computer and create a new project of win32 Console Application. Name the project and select its location then click OK.

newprojectwizard.jpg

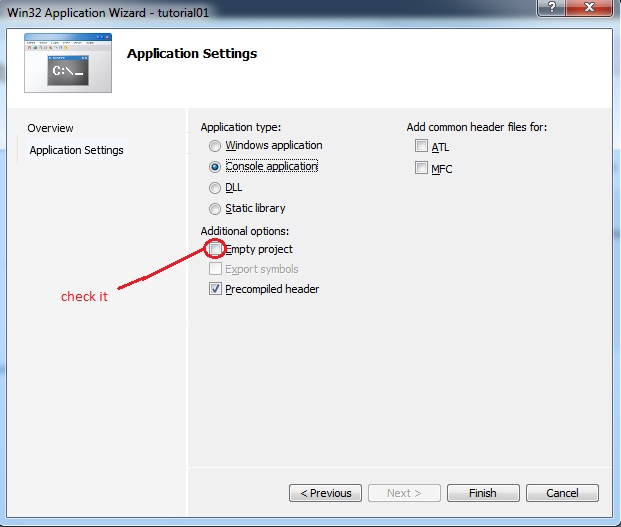
In the appeared Window select Application settings, in the additional options check the Empty project check box. Click on Finish button.

appset.jpg

Step 2: Add header files search path

You have to include the header folder to search path, in order to use the engine. The header files can be found in the KGE SDK directory "Include" and "Libs".

Let's explain shortly how to specify this file in Microsoft Visual Studio: ( maybe different for every IDE and compiler you use )

Microsoft Visual Studio 2010

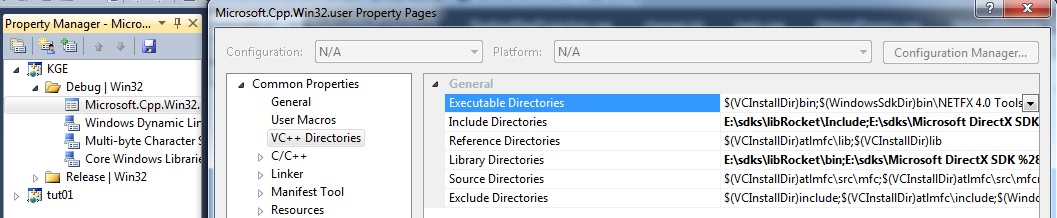
After creating your project goto View menu then select property manager in the opening window select your project-> Debug | Win32 Right click on Microsoft.Cpp.Win32.user and select properties. On new opend window select VC++ directories. In Include directories add KGE SDK "Include" and "Libs" folders path. In Library directories add KGE SDK "bin/debug" and "libs" folders path.

prm2010.jpg

Microsoft Visual Studio 2005-2008

Select Tools menu and select Options. Select the projects entry and then select . Select ‘show directories for include files’ in the combo box , and add “Include” Directories of KGE engine. Compiler also need to find the library files of engine,so stay in that dialog , select ‘show directories for Library files’ and add the libs directory of engine and also add the “Debug” directory.

Click Button.

Microsoft Visual Studio 6.0

if you use Microsoft Visual Studio 6.0,Select Menu and select , In the Option Window Select Tab and select the ‘Include’ Item in the combo box. Now Add the "Include" and "Libs" Directory path of the KGE engine folder to the list of directories. Now the compiler will find the “kge.h” header file. Compiler also need to find the library files of engine, So select the ‘Library’ item in the combo box and add the “Libs” directory of the engine and also add the “Debug” directory of engine to find “kge.lib”

That’s it. With your IDE set up like this, you will now be able to develop applications with the Kochol Game Engine.

Step 3: Lets start!

Just write this program and compile it to make sure that you do all thing right.

#include <kge.h>
#pragma comment(lib, "kge.lib")
int main()
{
pDev = KGE_NEW(kge::Device)();
return 0;
}

Hello KGE

This tutorial shows how to use Kochol Game Engine

We recommend if you want test KGE change the codes in this tutorial

// Include the kge.h and it will include the other header files automatically
// But its not the best way to use KGE when your project is big. The compile time
// will be increased in this way.
#include "../../Include/kge.h"
// Tell the compiler to link with kge.lib
#pragma comment(lib, "../../bin/debug/kge.lib")
// Everything for KGE is in kge namespace
// The Device class is the main class that initialize the KGE and its submodules
// The classes for working with graphics card is in gfx namespace. Advanced users
// can use classes in this name space for custom rendering.
// The renderer class has many functions for sending commands to graphic card.
// KGE has two layer the first layer is flexible and the second one is easy to use.
// The second layer uses first layer to make tasks easy for end user.
// The sn namespace contains everything that is related to scene and graphics rendering
// and it makes tasks easy for you.
// The main class in sn namespace is SceneManager that can manages the scene nodes in
// engine and know about the rendering path.
// We need a camera to view our world from it
// Define a scene node for storing the mesh pointer
int main()
{
// First we need to initialize the device before doing anything else
// The InitParameters structure contains the parameters that we want to pass
// them to KGE. We can accept default parameters for now
dev.Init(params);
// After initializing of engine we can get the pointer of Renderer and the SceneManager
pRen = dev.GetRenderer();
pSnMgr = dev.GetSceneManager();
// Now we need a camera to view our world. We ask from SceneManger to add a camera node
// to the scene
pCam = pSnMgr->AddCameraNode
(
kge::math::Vector(5, 5, 5), // The position of camera
kge::math::Vector(), // The target of camera. The point that camera look at
kge::math::Vector(0, 1, 0) // The up vector, shows the up view direction
);
// Now we load a 3D model as static mesh
pMesh = pSnMgr->AddStaticMeshNode("../../media/models/box.ms3d", true);
// Disable lighting this part will be changed or explained later
// We add a timer to get elapsed time
// The main loop that render the scene
// The Device.Run function handles the engine device
while (dev.Run())
{
// Begin the rendering and clear the color buffer
pRen->BeginRendering(true, true, false);
// Tell the scene manager to render everything and pass the time elapsed
pSnMgr->RenderAll(t.GetTimeElapsed());
// Show the scene on window
pRen->EndRendering();
}
}